No matter what is your building, roof flashing should be installed. Before starting, let’s examine how to install roof flashing on different structure places.
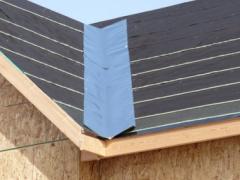 The roof flashing is a construction material, the purpose of which is to protect against leaks and seepage of water. Mostly it is produced of galvanized metal, sometimes of aluminum, metal sheet, copper, or plastic. For flashing materials the best ways are still galvanized metal or aluminum. The second one has the simplest installation because of well bending. But the assembly ways depends on roof places. How to install roof flashing on different structure places?
Which roof places need flashing mounting?
It is the home protection, so should be placed on the entire structure surface that really needs extra care. These are joints like edges around chimneys, vents, roof valleys, soil stacks, and skylights. If you have already had some leaking problems, firstly you have to check these roof places for any damages with the existing flashing. It is often met that nails are staggering and you just need to better attach them, or replace with new ones.
Preparing process for roof flashing
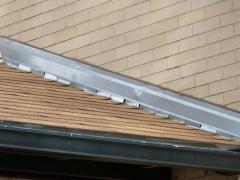 Nowadays manufacturers of such materials eased the task for homeowners and produce them in the finished forms, depending on the installation location:
- Step flashing which purpose is protection of joints between the roof structure and chimney, and sometimes it can be the skylight protection. It is shaped especially for fitting all tiles courses, going up the chimney wall and looking like “step” up.
- Vent pipes flashing suites all pipes or flues that are standing on your home roof. It looks like a cylinder and usually has a big flange on its base where you will lay tiles.
- Valley flashing has V or W shapes and is attached on the bitumen felt top before tiles laying.
- Edge flashing is placing along eaves. It prevents from water leaking under the ready roof structure.
Roof flashing setting
The answer on how to install flashing on a roof really depends on its installation areas.
Chimney flashing
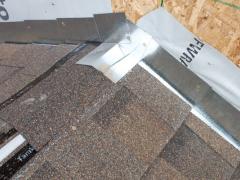 You need to place this material around a chimney basis when tiles are already installed. Then cut a step flashing in a way that it could tightly seal around the chimney on its all parts (front, side, base). At the base place apply some plastic cement and then attach the main material with the help of galvanized nails.
Leave the top material part that seals the chimney unattached. You have to continue this laying around the chimney length, notching each flashing step to its fitting. Wrap a counter material around the whole chimney and attach it with steel fasteners. Leave obligatorily a gap of 1 inch between tiles and side flashing bottom. Apply some plastic cement on the counter flashing top and all the gaps.
Vent pipes
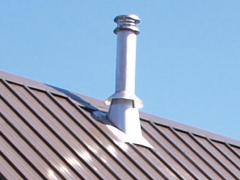 For vent pipe flashing placement you need to install the upper part below tiles and a bottom part right on top of tiles. Lift tiles around the vent place (if they are already existing on your structure), move the vent flashing upper part beneath them. Notch a membrane material for safety placement between the vent flashing and roof structure and then make a cut of vent opening. Apply some silicone around the readymade opening and lay the membrane material. Then install your vent material on the membrane top. The metal flashing has to be installed in the overlap way, and not around.
Using your galvanized nails drive them in the vent base. All tiles have to lay right on the upper part of the vent flashing top while its bottom part needs to lay right on top of tiles and showing. Apply some silicone along tiles that can help you to create a better safety.
Valley flashing
 Making this step process, firstly you should lay some waterproof material on valley places, especially if your house is placed in the snowy and frizzy area. Follow the manufacturer directions when laying underlayment and then place on top your valley flashing. Select your valley flashing among V and W shapes. When placing it down, be sure that it is on the same level with drip edges at the bottom valley part. It needed to be cut with the help of your tin snips. Drive nails in material place every foot or along its outside edges, but never do this process in the middle place. You can apply roofing cement on any seams and nail heads for their extra protection.
Drip edges
If you have conscientiously fulfilled all of the above steps, you can surely set drip edges. They have corner forms, so attach them with the help of nails along the whole roof edge. You should drive in drip edge under a builder’s felt, but still over the fascia plate. Use some roofing cement for nail heads covering and stick this felt down. Having different overhangs, you need to set a drip edge over a felt and fascia that will surely protect them from the windy and rainy weather. Now you know perfectly how to install roof flashing on all the structure places.



How to install roof flashing on different structure places?