In the modern construction slanted roofs are quite widespread. The information how to build a slanted shed roof in the fastest possible time and not too expensive can be found in this article.
A shed is indispensable outbuilding on a farm and in a garden area. Seasonal storage of tools and materials can be left here for a short-term. Advanced gardeners equip in sheds even a comfortable bathroom and shower stall. In short, with a shed existence, the use of it in any case can be found. The purpose of this construction is strictly utilitarian, so the outward appearance does not need many requirements, the main thing – ease of use and building. So, let’s talk about how to build a slanted shed roof without a lot of effort.
Required tools
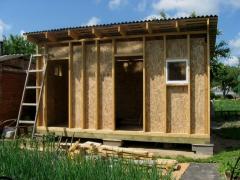 This covering type requires a minimum number of construction materials and it is still the simplest method for execution. This design, like other types of coatings, should be made with the use of wood as the basic material. It is taken as a basis for rafters and beams and other necessary elements. The coating material for a slanted shed roof can be varied: slate, metal tiles, shingle, and others.
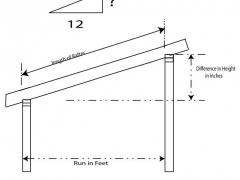
Each item has a feature, as well as the slanted roof angle: it must be clearly equals to thirty five degrees. At the same time the folded roof may vary in the slant from eighteen degrees.
Before you start the working process, you should prepare all the necessary materials for roof installation:
- Wooden beams (they will serve as a supporting structure, so the size should be small, five or six inches in diameter, for example);
- Board (will be needed to perform the finishing of walls in the attic space, and they have to be placed along on the top of horizontally positioned boards);
- Slate and nails related to it (if you will use other roofing material than you need to choose the appropriate method of attachment);
- Materials for thermal-, steam- and waterproofing;
- Ordinary nails (they are needed for conventional mounting beams and wooden boards).
The roof installation
The phased installation of how to build a slanted shed roof comprises the following steps:
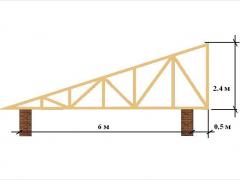 At the first stage the mauerlat is installed. Place it at the ends of the outer wall on the pre-fixed waterproofing material. Mauerlat must be fixed with the help of anchor bolts, wires, or plugs. The lower end of rafter is attached at the mauerlat;
- Then make rafters. For their forming take a pine board with a thickness of 2 inches. In the lower end of the rafter leg cut out the opening for the mauerlat abutment. The upper end is also subjected to processing. Saw a bevel in it, which will let rafters to flex;
- In cases, where the span of a slanted roof is more than 15 feet, rafters are additionally strengthened with struts, which are installed under each leg;
- Fix the rafters along the construction edge on the one side, and on the other side fix them on a vertically reinforced beam;
- Attach a board (uncut) to the settle rafters, on which you need to lay a vapor barrier material (film construction). This material must be laid across the rafters and overlap. Joints are sealed with vapor barrier;
 Stack insulation boards on the film top. The insulation thickness of 8 inches is laid as a flat carpet. Above the insulation place a waterproofing canvas by a stapler;
- It is necessary to mount a vapor barrier. It prevents the penetration of moisture and condensation in the insulation. By a staple gun mount this material at the bottom of rafter leg. The stacking should be overlapping;
- On top of these layers stack a lathing. For its manufacturing use bars (50×50) and fix them across rafters. They can be placed with intervals or completely.
Covering a slanted roof
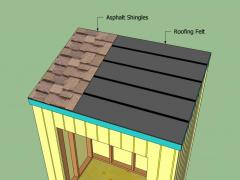
The next step of how to build a slanted shed roof should be the roof covering on a wooden decking. A variety of roof materials give a great fantasy flight. There are some of the most suitable and their distinctive characteristics.
 Floor decking – inexpensive and excellent protection from rain and snow.
- Slate – long operation for at least 30 years; easy installation. The downside is that it is not always advisable to use for small-sized sheds.
- Seam roof – very easy to stack, as it is a thin metal sheet; easy to install; but it is quite expensive.
- Tile or shingle – looks nice, but is suitable mainly for large sheds, which are made of stone.
- Different roll materials (bitumen felt, roofing, etc.) – very simple in styling, perfectly protect a construction from the rain; are durable and serve for a long time (on average 30-40 years); and differ with the cheapness.
Important! As a slanted roof often has not very big angle of inclination, it constantly accumulates water in the rainy season or winter. In order to avoid various troubles, you should mount in the roof a heating device, heating a roof from the inside and not allowing a large quantity of water to be accumulating at the surface.
Q&A on building a slanted roof of a shed
Question: What is the best roof slant angle if we have fairly cold, windy winters with a lot of snowfall?
Answer: Single pitch roofs have less sailing than gable roofs. They are more resistant to wind loads, but provided that the slope is minimal. However, with a decrease in the angle of slope increases vertical loads, so you need to stick to the golden mean. The optimal slope of the roof is provided at an angle of 30-35°. Then it will not be pressed by snow and storm damage. Filing gables and overhangs significantly reduces the risk of falling off the roof – the air masses, skirting the edges, losing some of its destructive energy.
Question: I want to build a roof for the shed myself. What should I pay attention to, so that I don’t have to redo my construction later?
Answer: We will highlight the most common mistakes and tips from professionals to avoid complications.
The most common mistakes:
- Improperly chosen cross section of the rafters. As a result, the roof can collapse.
- Wooden elements of the rafter system is not treated with antiseptics. Wood can quickly lose its quality due to mold and mildew.
- Improper location of roofing sheet material. It is the wrong direction of installation of roofing elements from top to bottom.
- Lack of waterproofing entails a constant high level of humidity inside the rafter system. This leads to the occurrence of processes of rotting wood and loss of load-bearing capacity of rafters.
We also recommend:
- The orientation of the building should be such that the slope of the roof is directed to the leeward side according to the local wind map.
- The length of the roof overhangs should protect the walls and entrance to the barn from precipitation as much as possible.
- The roof pitch can be kept to a minimum when the structure is in an open space where snow will be blown away as much as possible by the wind.
Question: Can you tell us about the advantages and disadvantages of sloped shed roofs?
Answer: The popularity of single-pitch roofs can be explained by quite significant advantages.
- Simplicity – a single pitch roof with their own hands without mistakes and rework, will be obtained without profile experience. The rafter system in one plane is easier to perform than in two, it is enough to correctly calculate the parameters of the rafters and the optimal distance between them.
- Less weight of the structure – whatever the size of the house and the square footage of the roof, one slope always weighs a little less than two, not to mention four. The bulk of the wall materials with a reserve will withstand both gable and hip, but the lower will be a constant load on the box and the base, the better.
- Economy – if the choice of a single slope due to a desire to save as much as possible, you can be disappointed. Yes, the lumber, fasteners, insulation, protective membranes and roofing on one slope need less than on two, but particularly significant difference in costs will not be, especially when the slope angle is high. The area of the slope of this figure does not change, but form a height difference, not out of thin air. Yes, and the thickness of the thermal insulation layer in the roof of a single slope design should be greater, as air space or no or minimal. Therefore, the cost-effectiveness of the single pitched roof is not achieved at the expense of lower costs for supplies, but due to the possibility of using a simpler roof covering, it is still not visible on the front side.
Disadvantages of roofs with a single slope also have, where without them, but some real and due to the design, while others from the category of “myths”.
- We need a reinforced drainage system – the whole mass of precipitation is going into a single gutter, it is logical that it must be stronger, with increased capacity and an increased number of fasteners.
- There is a binding to the wind rose – not always realistic to position the house on the site so that the lower part of the slope was to leeward, and the descent of the snow did not threaten other buildings or residents.

How to build a slanted shed roof without a lot of effort?