If you want to create a comfortable construction, well retaining heat in cold weather and cool in summer, then read how to build a yurt.
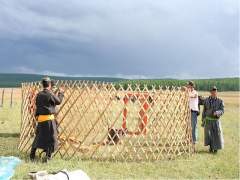 Yurt is a dwelling of nomadic people. Due to this fact it has a round shape at the base, the same size elements and a minimum number of parts. Basic requirements to the process of how to build a yurt:
- light weight in the folded position for transportation over long distances;
- short time and ease of installation;
- warm and purged housing.
Modern yurts are more manufacturable for producing than their traditional counterparts. Due to new materials some nodes of connections are changed and elements requiring bending of wooden elements are excluded, as well as the ability to withstand load is significantly increased. The use of modern materials and technologies allowed to provide comfortable accommodation in a contemporary yurt even for a modern city dweller.
Field of yurts using
Yurts have got an increased popularity thanks to their universality of use. Looking closer to the mobile and practical design, people have found innovative usage of nomadic dwellings. Today yurts are in various spheres of human activity:
 Construction. Compared with traditional site huts, a yurt is spacious and easier to carry. It provides better protection from wind and cold. Especially promising use is in the laying of roads, pipelines, power lines and other construction types in the open field;
- Sport and tourism. The growing popularity of ecological and ethnic tourism has paved the way for the yurt spread in this field. They are ideal for outdoor activities. Creation of terminal stations, temporary camps, mobile training systems can not be performed without yurts;
- Trade and hotel business. The using of yurts is economically justified. Entrepreneurs are relieved of the need to build or lease capital buildings for hotel complexes. They need only a land plot. Moreover, many tourists and holiday-makers are attracted to such a non-trivial approach to issues of service;
- Everyday life. The high mobility of nomadic housing can solve many problems associated with work and leisure. For example, yurts can be used for arranging visiting the apiary or during outings to relax.
They are used for the organization of trade, public catering, different clubs, fishing, hiking and a number of other cases.
Installation of the yurt
One of the advantages of the yurt is the simplicity of its installation. If you have elementary skills, it is easy to build a yurt from scratch, which takes a couple of hours. The process can be divided into several stages:
Choosing and preparation the plot
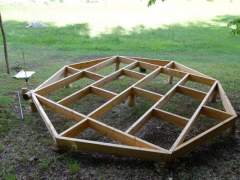
Choose the desired location on the hill, but in any case not in the valley. The area should be smooth and free of excess vegetation, fallen branches, snow, etc. Initially, you need to lay flooring in the previously prepared bars. It may be boards, small size panels or any wooden planes. It is important to raise the floor above the ground for ensuring its ventilation.
Walls and doorway installation
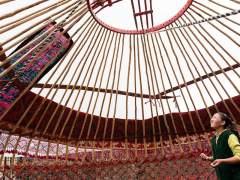 Walls should be in the form of lattice – kerege. Flat wooden slats are fastened together with rawhide. A kerege determines the size and housing capacity. Before starting the installation, use chalk to mark the outer loop. Thanks to the mobile connection, walls are stretched like bellows of an accordion. They are mounted on a painted circle.
Sections are fastened together with a rope, wire, twine or other flexible materials. Door unit firmly connected to kerege, closes the circle. The door frame is fixed to the wall with the help of ropes. There are special recesses which are installed for a lattice base. The top part of lattice is hooped with a rope.
Roof frame installation
The framework consists of the flue window (tunduk) and rafters. Poles are sharpened at one end, which are attached to the opening hoop for smoke in the ceiling center. Initially tunduk is held by three rafters. This simplified version of the roof is installed on walls and tied with ropes to the cross-shaped end of kerege.
Other poles are evenly set and similarly attached to the base. After completion of the installation, rafters should be fasten together with a rope at the smoke window. Now you need to check the belt tension, spanning the kerege. The upper wall part at the same time should have a small inclination towards the center.
Coating construction
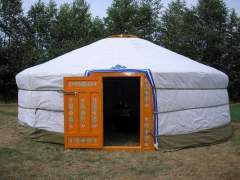 At the final stage the installed ceiling frame is covered with a fabric cape. It should hang on kerege of about 2 inches. Walls are wrapped in felt and linked to a lattice to prevent from slipping. The roof is covered with felt in the last turn. The semi-circular cut-out must be located at the doorway.
Felt should hang down freely, do not pull it. Above the insulation a cape of water-repellent fabric is laid. The yurt is attached with decorative ribbons that encircle the structure on the perimeter. The smoke window is thrown with square felts with ribbons at corners. They are attached to the walls of the structure below and keep a cape from tipping in strong winds.

